How to Unclog Your Bathroom Sink with Ease

Sara DeSantis • October 25, 2024

Tired of staring at a slowly draining bathroom sink? You're not alone. For homeowners, a clogged sink can become a frustrating nuisance. You have the ability to tackle this issue yourself. This guide will introduce you to straightforward methods to unclog a bathroom sink, even if it has a stubborn stopper in place. By the end of this post, you'll gain insights into essential techniques that could save you both time and money.

Understanding the Problem Where Do Clogs Come From?

The first step to solving any problem is understanding its root cause. Bathroom sink clogs typically result from a buildup of hair, soap scum, toothpaste, and

other materials. Over time, these substances combine to create blockages that impede water flow.

Hair is a frequent culprit. It’s easy for strands to slip down the drain, especially when washing hair or brushing out tangles. While hair might seem innocuous, it

can quickly form dense masses that trap other debris.

Soap scum is another major contributor to clogs. When mixed with hard water, soap can leave a residue on pipes, gradually narrowing the passageway. Add

toothpaste and general grime to the mix, and you’ve got a recipe for a clogged sink.


Tools of the Trade Getting Equipped

Before rolling up your sleeves, it's essential to gather the right tools. Having the appropriate equipment on hand can make the process smoother and more

effective.

Start with a plunger. While typically used for toilets, the right-sized plunger can work wonders on sink clogs. The key is to ensure a tight seal, so choose a small,

flat-bottomed plunger designed for sinks.

Next, consider a plumber's snake or auger. This tool is excellent for breaking up tough clogs that a plunger can't handle. Available in manual or powered

versions, it can reach deep into the pipes.

Lastly, stock up on cleaning supplies. A simple mixture of vinegar and baking soda can act as a natural drain cleaner. It’s eco-friendly and can help dissolve minor

blockages without the use of harsh chemicals.


Dealing with the Stopper Navigating Obstacles

Many bathroom sinks come equipped with a stopper, which can complicate matters when clearing clogs. The first thing to do is to understand the type of

stopper you're dealing with.

Pop-up stoppers are common. Operated by a lever or knob, they can be removed by unscrewing the linkage underneath the sink. Once detached, you’ll have

better access to the drain.

Push-and-pull stoppers, on the other hand, require a bit more finesse. You may need to twist and pull to remove them, but be careful not to apply too much

force, which could cause damage.

Finally, lift-and-turn stoppers can often be removed by unscrewing the knob on top. Once removed, you'll have full access to clear the clog.


The Plunger Method Simple Yet Effective

For many homeowners, the first line of defense against a clogged sink is the trusty plunger. This seemingly simple tool can often solve the problem without

further intervention.

Begin by filling the sink with enough water to cover the plunger’s cup. This water will help create a seal, making the plunging action more effective. Place the

plunger over the drain, ensuring a snug fit.

Pump the plunger up and down rapidly. The goal is to create enough suction to dislodge the clog. After a dozen or so pumps, check to see if the water drains

freely.

If successful, run hot water down the drain. This helps clear away any remaining debris and ensures the clog is fully resolved. If the water still drains slowly, you

may need to try another method.


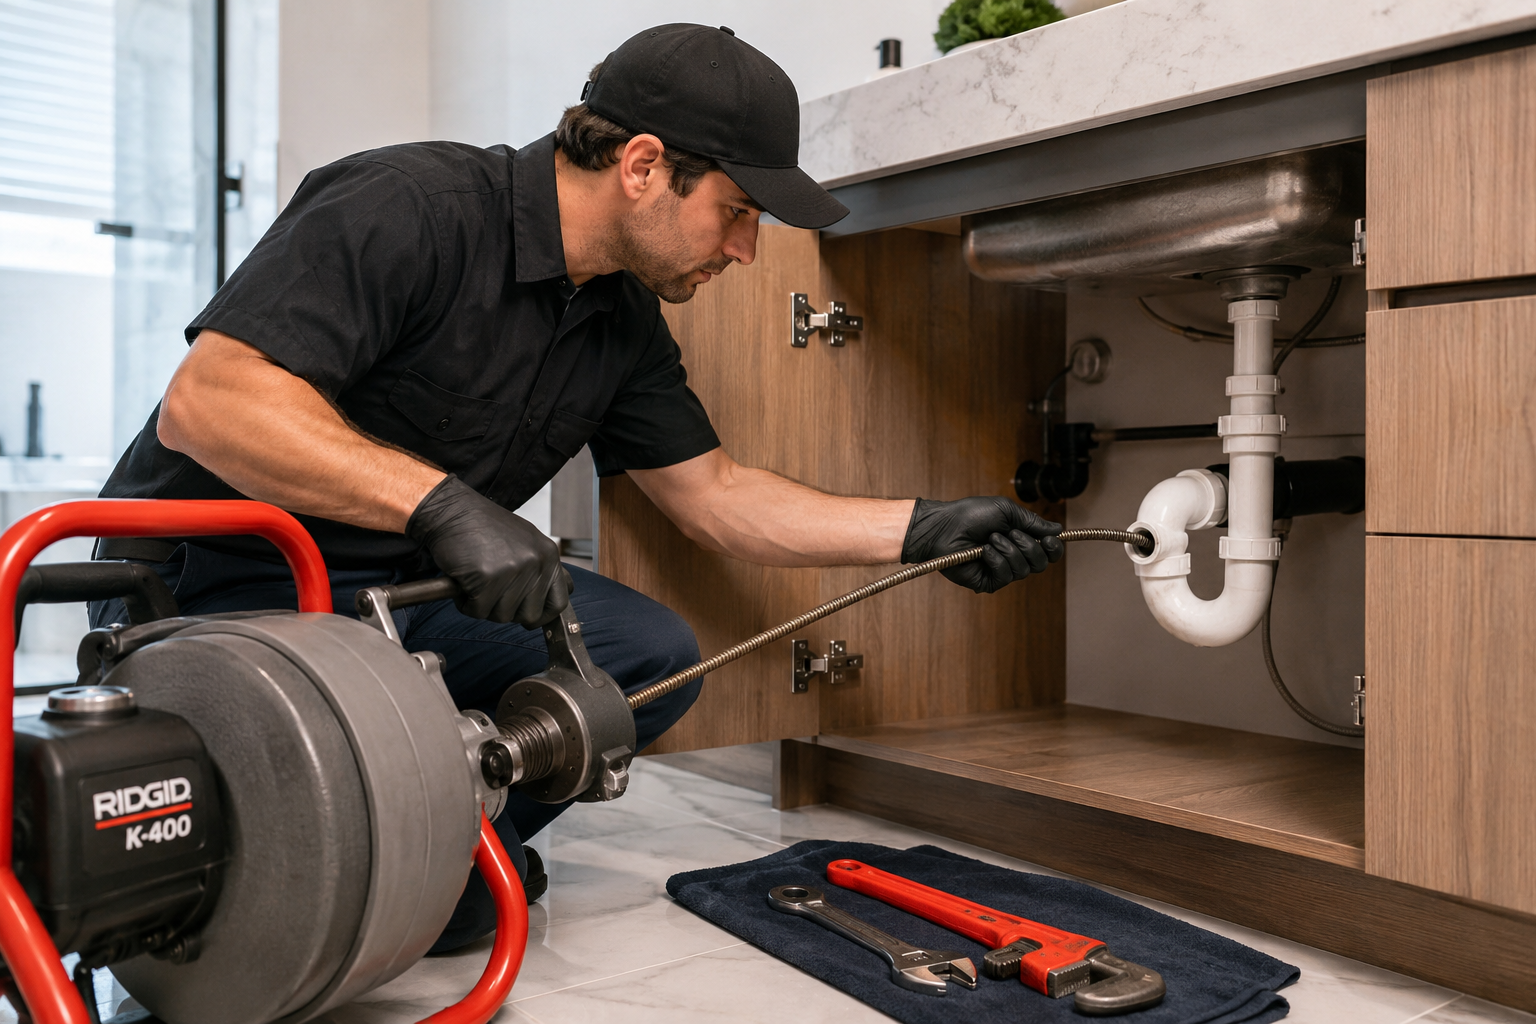
Auger Assistance When the Plunger Isn't Enough

If a plunger doesn't do the trick, it might be time to call in reinforcements. A plumber's snake or auger can reach deep clogs that are out of reach for other tools.

Insert the auger into the drain and rotate it clockwise. The goal is to catch and break up the clog as you advance the auger deeper. Be patient, as this process can

take some time.

Once you feel resistance, you've likely hit the clog. Keep twisting the auger to break it apart. Then, slowly retract the tool, bringing up any debris caught on the

end.

After using the auger, run hot water through the drain. This will help flush out any remaining particles, leaving your sink clear and free-flowing.


Homemade Solutions Natural Cleaners

For those who prefer a gentler approach, natural cleaners can offer an effective solution. A mixture of baking soda and vinegar is a time-tested remedy for minor

clogs.

Start by pouring half a cup of baking soda down the drain. Follow this with a half cup of vinegar. The combination will fizz, helping to break down the buildup inside

the pipes.

Allow the solution to sit for 15 to 30 minutes. This gives it time to work on the clog. Afterward, flush the drain with hot water to clear away the dissolved debris.

If the clog persists, you may need to repeat the process. While this method is gentle on pipes, it may not be effective for severe blockages.


Chemical Cleaners Pros and Cons

For particularly stubborn clogs, chemical drain cleaners might seem like an attractive solution. These powerful products can dissolve clogs quickly, but they come

with considerations.

Chemical cleaners are caustic, which means they can potentially harm your pipes if used excessively. They can also pose risks to health and safety, so wear

gloves and ensure proper ventilation.

If you choose to use a chemical cleaner, follow the manufacturer's instructions carefully. Pour the suggested amount into the drain, allowing it to sit for the

recommended time before rinsing with water.

While effective, chemical cleaners should be a last resort. Whenever possible, try less aggressive methods first to avoid potential pipe damage.


Prevention Tips Keeping Clogs at Bay

Once you've successfully unclogged your sink, prevention becomes key. Implementing a few simple practices can minimize the likelihood of future blockages.

Use a drain cover. A mesh or rubber cover can catch hair and debris before it enters the pipes. Clean it regularly to ensure optimal performance.

Be mindful of what goes down the drain. Avoid washing hair or excessive soap residue directly into the sink. Dispose of these items in the trash instead.

Run hot water regularly. After using the sink, run hot water for several minutes. This helps clear away any lingering substances before they can accumulate.


When to Call the Expert's Professional Help

While DIY methods are often effective, some clogs are best left to professionals at A Rescue Rooter in Hamilton to avoid causing further damage.

If none of the above methods work, it's a sign that the clog may be more complex. Professionals have access to advanced tools and techniques to address these

issues.

Additionally, if your sink is draining slowly despite being clear of clogs, a larger plumbing issue may be at play. A Rescue Rooter in Hamilton can diagnose and

resolve these problems.


A clogged bathroom sink can be an unpleasant inconvenience, but it's one that homeowners can often tackle themselves. By understanding the causes of clogs

and using the right techniques, you can restore your sink to full functionality. Remember, prevention is key. Implementing simple habits can keep your drains

clear and prevent future blockages. And when in doubt, don't hesitate to call on plumbing experts for assistance. Whether you're a seasoned DIYer or new to

home maintenance, mastering the art of unclogging is a valuable skill. Armed with these tips and techniques, you're ready to face any drain dilemma head-on.


A Rescue Rooter…905-521-8284

Never a Premium Charge for an Emergency


February 27, 2026
As the snow melts and the first green shoots of spring appear, it feels natural to breathe a sigh of relief. The harsh winter is finally behind us, and warmer days are ahead. However, while you are ready to welcome the sunshine, your home’s plumbing system might be facing its most difficult challenge of the year.  The transition from freezing winter temperatures to the damp warmth of spring creates specific environmental changes that can stress your pipes. Understanding what happens beneath the ground during the "spring thaw" is the first step in protecting your home from unexpected leaks and water damage. By staying vigilant and knowing what to look for, you can ensure your plumbing transitions into the new season as smoothly as you do. How the Spring Thaw Affects Your Plumbing It is easy to assume that the danger to your pipes passes once the sub-zero temperatures vanish. In reality, the thawing process can be just as damaging as the freezing process. When the ground freezes, it expands. As it thaws, the soil contracts and shifts. This movement can put immense pressure on your home's water and sewer lines buried underground. If the earth shifts too dramatically, it can cause pipes to crack, bend, or even detach completely. Additionally, the spring thaw brings water—lots of it. Melting snow saturates the soil, raising the water table. This excess water puts hydrostatic pressure on your foundation and pipes, potentially leading to basement flooding if your drainage systems aren't working perfectly. Common Signs of Pipe Damage Because much of your plumbing is hidden behind walls or buried underground, you might not notice an issue until it becomes a significant problem. Keep a close eye on your property this season for these tell-tale signs of distress: 1. Soggy patches in the yard If it hasn't rained recently, but you notice distinct wet, spongy, or unusually green patches of grass in your yard, this could indicate a leak in your underground water line. The escaping water rises to the surface, creating a localized swamp. 2. Low water pressure A sudden drop in water pressure throughout the house is often a symptom of a breach in the main line. If the water isn't reaching your faucets with the usual force, it may be escaping somewhere else along the route. 3. Unpleasant odors If your sewer line has been compromised by shifting soil or infiltrating tree roots (which become active in spring), you may smell sewage inside your home or out in the yard. This is an urgent issue that requires immediate attention. 4. Unexpectedly high water bills Sometimes the signs are financial rather than physical. If your water usage hasn't changed but your bill has spiked, water is likely leaking from a pipe somewhere on your property. Preventive Measures for Homeowners While you cannot control the weather or the shifting soil, there are several steps you can take to minimize the risk of damage during the spring thaw. Test your sump pump: This is your first line of defense against meltwater. Pour a bucket of water into the sump pit to ensure the pump activates and drains the water effectively. If it doesn't, you need to repair or replace it before the heavy spring rains arrive. Clear your gutters and downspouts: Ensure that melting snow and spring rain can flow freely away from your home’s foundation. Clogged gutters can cause water to pool around the base of your house, increasing pressure on basement pipes and the foundation. Check outdoor faucets: Once the threat of frost is truly gone, turn on your outdoor spigots to check for flow. If you place your thumb over the opening and can stop the flow of water, the pressure is too low, indicating a potential leak inside the pipe. When to Call the Professionals Plumbing issues can be stressful, and it is often difficult to know if a problem is a simple DIY fix or a professional emergency. We understand that your home is your sanctuary, and dealing with water damage is disruptive and upsetting. If you notice persistent low pressure, damp spots on your drywall, or standing water in your yard, it is time to call for help. Attempting to dig up underground pipes or fix complex sewer lines on your own can often lead to further damage and higher costs. At Rescue Rooter, we have the specialized equipment to inspect underground lines without destroying your yard. Our team can identify cracks caused by the spring thaw and provide efficient, lasting solutions. We are here to help restore your peace of mind so you can get back to enjoying the warmer weather. Enjoying a Worry-Free Spring Spring should be a time of renewal and enjoyment, not a time spent worrying about wet basements or broken pipes. By keeping an eye out for the signs of shifting soil and testing your drainage systems early, you can catch small issues before they become major headaches. And remember, if the thaw does bring unexpected plumbing challenges, you don't have to face them alone—Rescue Rooter is just a phone call away.
January 31, 2026
Winter brings cozy nights and festive cheer, but it also carries the risk of a messy and expensive household problem: frozen pipes. When water freezes, it expands, putting immense pressure on your plumbing. This can lead to burst pipes, significant water damage, and costly repairs. Understanding how to protect your home before a cold snap and what to do if a pipe freezes is essential for every homeowner. Proactive Steps to Prevent Frozen Pipes The best way to deal with a frozen pipe is to prevent it from ever happening. A little preparation before temperatures plummet can save you a lot of stress and money. Focus on areas of your home where pipes are most vulnerable, such as basements, crawl spaces, attics, garages, and exterior walls. Insulate Vulnerable Pipes Insulation is your first line of defense. It slows the transfer of heat, keeping the water inside your pipes from reaching freezing temperatures. Pipe Sleeves: You can find foam or fiberglass pipe sleeves at any hardware store. They are inexpensive and easy to install. Simply cut them to size and wrap them around exposed pipes. Secure them with tape for a snug fit. Heat Tape: For pipes in extremely cold areas, consider using electrical heat tape or heat cables. These products wrap directly around the pipe and have a built-in thermostat that turns the heat on when the temperature drops, providing consistent protection. Seal Air Leaks: Cold air infiltration is a major contributor to frozen pipes. Use caulk or insulation to seal any cracks or holes in your foundation, walls, and around windows, especially where pipes enter your home from the outside. Keep the Water Moving Even a small trickle of water can be enough to prevent a pipe from freezing solid. When an arctic blast is in the forecast, take these simple steps. Let Faucets Drip: Open the faucets connected to vulnerable pipes just enough to let a slow, steady drip of both hot and cold water flow. This moving water is much harder to freeze. Open Cabinet Doors: Pipes under kitchen and bathroom sinks are often located in unheated cabinets against exterior walls. By leaving the cabinet doors open, you allow warmer air from your home to circulate around the plumbing, keeping them warmer. Maintain a Consistent Temperature Your home's overall temperature plays a crucial role in protecting your plumbing system. Set Your Thermostat: Keep your thermostat set to a consistent temperature both day and night. While you might be tempted to lower it at night to save on heating bills, the extra cost is minimal compared to the expense of a burst pipe repair. Winterizing Your Home: If you plan to be away for an extended period during the winter, never turn your heat completely off. Set the thermostat to at least 55°F (13°C) and consider asking a friend or neighbor to check on your house periodically. What to Do If Your Pipes Freeze Sometimes, despite your best efforts, a pipe may freeze. The first sign is usually a trickle of water—or no water at all—coming from a faucet. If you suspect a frozen pipe, you need to act quickly. Step 1: Locate the Frozen Pipe Your first task is to identify the frozen section of pipe. Start by turning on all the faucets in your house. If one is not working, the frozen area is likely located between that faucet and the main water supply. Look for pipes in unheated areas or along exterior walls. A visible layer of frost or a slight bulge in the pipe can also indicate a freeze. Step 2: Thaw the Pipe Safely Once you've found the frozen section, you can begin the thawing process. The key is to apply heat gradually and safely. Open the Faucet: Before you start thawing, make sure the faucet connected to the frozen pipe is open. This allows melting water and steam to escape, relieving pressure inside the pipe. Apply Gentle Heat: Use a hairdryer on a low setting, a portable space heater (kept a safe distance away), or heating pads designed for this purpose. Start near the faucet end of the blockage and work your way back toward the frozen area.  Never Use an Open Flame: Do not use a blowtorch, propane heater, or any other open-flame device to thaw a pipe. This is extremely dangerous, as it can damage the pipe and create a serious fire hazard. Step 3: Check for Leaks As the pipe thaws, water flow should be restored. Keep a close eye on the entire length of the pipe you just thawed. The expansion from the ice may have created cracks that will begin to leak as the water melts. If you spot a leak, shut off the main water supply to your home immediately to prevent water damage. When to Call a Professional While some minor freezes can be handled on your own, certain situations require expert intervention. A burst pipe is a plumbing emergency that demands immediate professional help. If you are unable to locate the frozen pipe, if the pipe is not accessible, or if your efforts to thaw it are unsuccessful, it’s time to call for help. Attempting complex repairs without the right tools or experience can lead to bigger problems. The pros at A Rescue Rooter specialize in emergency plumbing services, including frozen and burst pipe repairs. Our experienced technicians have the advanced tools needed to quickly locate and safely thaw frozen pipes, even those hidden behind walls. We can assess the situation, repair any damage, and help you implement long-term solutions to prevent future freezes. Don't let a frozen pipe turn into a disaster. A Rescue Rooter is available 24/7 to provide fast, reliable service when you need it most.
December 22, 2025
A small drip from a faucet is easy to spot, but what about the leaks you can't see? Hidden water leaks can silently cause significant damage to your home’s structure, promote mold growth, and lead to shockingly high water bills. Knowing how to spot the signs of these elusive leaks is a crucial skill for any homeowner. This guide will walk you through practical methods for detecting hidden water leaks and explain why acting fast is so important. Why You Must Address Leaks Immediately Ignoring a potential water leak is a gamble you don't want to take. Even a small, slow drip can have major consequences over time. Water can weaken wooden beams, crumble drywall, and damage your home's foundation. The persistent moisture creates a perfect environment for mold and mildew, which can pose health risks to your family. Beyond structural damage, the financial cost is twofold. First, your water bill will increase as you pay for water you aren't even using. Second, the repair costs for water damage are often far more expensive than the cost of fixing the leak itself. A simple plumbing repair can turn into a massive renovation project if left unchecked. Simple Ways to Find Hidden Leaks You don't need to be a professional plumber to start the search for a hidden leak. With a little observation and a few simple checks, you can often identify a problem before it gets out of hand. Check Your Water Meter Your water meter is one of the most reliable tools for leak detection. It measures all the water flowing into your home, so any unexpected activity can point to a leak. How to perform a meter test: 1. Turn off all water: Make sure no faucets are running, toilets aren't flushing, and appliances like the dishwasher or washing machine are off. 2. Locate your water meter: It's usually in a box near the curb or in a basement or utility area. 3. Check the leak indicator: Most modern meters have a small triangle, dial, or wheel that moves when water is flowing. If this indicator is spinning, even slowly, you likely have a leak somewhere in your system. 4. Note the reading: If your meter doesn't have a leak indicator, write down the numbers on the dial. Wait one to two hours without using any water, then check the reading again. If the numbers have changed, water is escaping somewhere. Scrutinize Your Water Bill Your monthly water bill provides a clear record of your usage. A sudden, unexplained spike is a major red flag. Compare your recent bills to previous months or the same period from last year. If your habits haven't changed but your usage has dramatically increased, it’s time to investigate. Many utility companies even provide daily or hourly usage data online, which can help you pinpoint when the excess water use is happening. Inspect Your Home's Interior Your walls, ceilings, and floors can offer visual clues of a hidden leak. Take a walk through your home and look for these signs: ● Discoloration or Stains: Yellow or brown stains on ceilings or walls are classic signs of water slowly seeping through. ● Peeling or Bubbling Paint: Moisture behind a wall will cause paint or wallpaper to peel, bubble, or blister. ● Warped Surfaces: Look for warped walls, sagging ceilings, or buckled flooring, especially around bathrooms, kitchens, and laundry rooms. ● Musty Odors: A persistent damp, earthy smell often indicates mold or mildew growth, which thrives in areas with hidden moisture. Listen for Unusual Sounds Sometimes, you can hear a leak before you can see it. During a quiet time in your home, like late at night, listen carefully for sounds coming from your walls. A dripping, hissing, or rushing sound when all faucets are off is a clear signal that water is running where it shouldn't be. Pay close attention to the areas where your main water line enters the house and around major plumbing fixtures. Don't Wait—Get Professional Help Finding a hidden leak can feel overwhelming, but you don't have to handle it alone. While these DIY tips can help you confirm a problem exists, locating the exact source and repairing it often requires professional expertise and equipment. A delayed response only makes the problem worse and more expensive to fix. At A Rescue Rooter, our experts are equipped with advanced leak detection technology to find the source of the problem quickly and accurately, without causing unnecessary damage to your home. We understand that plumbing emergencies don't stick to a 9-to-5 schedule. That’s why we are available 24/7 to help you.  Best of all, you can call us anytime without worrying about extra fees. A Rescue Rooter never charges a premium for after-hours, weekend, or holiday service. When you have a leak, you need help fast. We’re here to provide it, day or night. Contact us to get your leak fixed and your home protected.
Show More